what is a deployment?
A Kubernetes Deployment is used to tell Kubernetes how to create or modify instances of the pods that hold a containerized application. Deployments can scale the number of replica pods, enable the rollout of updated code in a controlled manner, or roll back to an earlier deployment version if necessary.
How to create a deployment?
using Command Prompt:
kubectl create deployment my-webdep --image=nginx --replicas=1 --port=80using yml file:
For that create a folder and inside that create a yml file as deployment.yml and paste the following command in that
apiVersion: apps/v1kind: Deploymentmetadata:name: nginx-deploymentspec:selector:matchLabels:app: nginxreplicas: 1 # tells deployment to run 2 pods matching the templatetemplate:metadata:labels:app: nginxspec:containers:- name: nginximage: nginx:1.14.2ports:- containerPort: 80
And run the following command in the terminal
kubectl apply -f deployment.yml
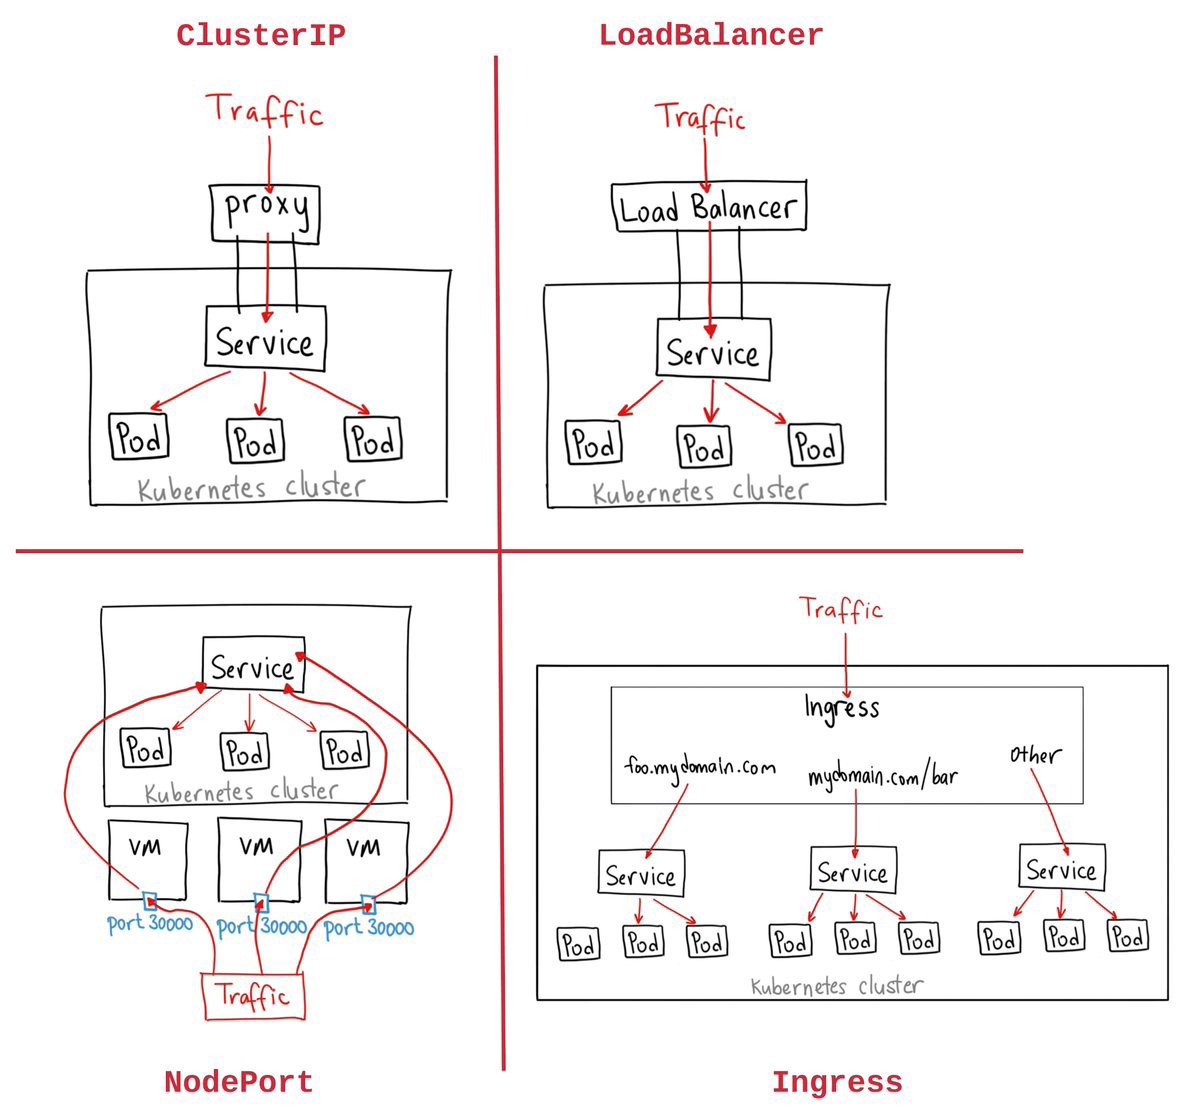
There are four different service types, each with different behaviors:
- ClusterIP exposes the service on an internal IP only. This makes the service reachable only from within the cluster. This is the default type.
- NodePort exposes the service on each node’s IP at a specific port. This gives the developers the freedom to set up their own load balancers, for example, or configure environments not fully supported by Kubernetes.
- LoadBalancer exposes the service externally using a cloud provider’s load balancer. This is often used when the cloud provider’s load balancer is supported by Kubernetes, as it automates their configuration.
- ExternalName will just map a CNAME record in DNS. No proxying of any kind is established. This is commonly used to create a service within Kubernetes to represent an external datastore like a database that runs externally to Kubernetes. One potential use case would be using AWS RDS as the production database, and a MySQL container for the testing environment.
Namespaces, Labels, and Annotations
Namespaces are virtual clusters within a physical cluster. They’re meant to give multiple teams, users, and projects a virtually separated environment to work on, and prevent teams from getting in each other’s way by limiting what Kubernetes objects teams can see and access.
Labels distinguish resources within a single namespace. They are key/value pairs that describe attributes, and can be used to organize and select subsets of objects. Labels allow for efficient queries and watches, and are ideal for use in user-oriented interfaces to map organization structures onto Kubernetes objects.
Labels are often used to describe release state (stable, canary), environment (development, testing, production), app tier (frontend, backend) or customer identification. Selectors use labels to filter or select objects, and are used throughout Kubernetes. This prevents objects from being hard linked.
Annotations, on the other hand, are a way to add arbitrary non-identifying metadata, or baggage, to objects. Annotations are often used for declarative configuration tooling; build, release or image information; or contact information for people responsible.
Kubernetes Tooling and Clients:
Here are the basic tools you should know:
- Kubeadm bootstraps a cluster. It’s designed to be a simple way for new users to build clusters (more detail on this is in a later chapter).
- Kubectl is a tool for interacting with your existing cluster.
- Minikube is a tool that makes it easy to run Kubernetes locally. For Mac users, HomeBrew makes using Minikube even simpler.
How to create a service?
kubectl expose deployment my-web --port=8080 --target-port=80 --type=LoadBalancerapiVersion: v1kind: Servicemetadata:name: my-servicespec:selector:app: nginxtype: LoadBalancerports:- protocol: TCPport: 8080targetPort: 80
kubectl apply -f service.ymlkubectl get svc


Comments
Post a Comment